Generators are often noisy an effective solution is often required to suppress the noise emitted from them. Generator noise is usually a nuisance because they are sitting on comparatively lightweight structures.
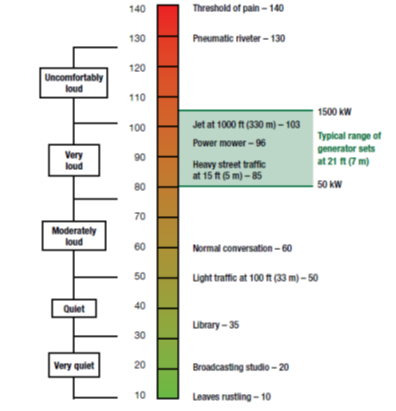
Engine-powered generator sets produce noise and vibration. Whether these generator runs continuously in power applications or only occasionally in standby mode, the generator operating sound levels must be reduced to comply with local, state or federal ordinances. The maximum permitted overall noise levels range from 45 dB(A) to 72 dB(A), depending on location and zoning. Some states and communities have begun to specify property line noise restrictions using octave band frequencies to reduce the amount of low-frequency noise that reaches community neighborhoods. Since untreated generator set noise levels can approach 100 dB(A) or more, both the location of the generator set and noise mitigation take on great importance.
The best way to soundproof and to reduce any noise from a generator regardless of size is to enclose it within a Floor Mounted 4-Sided Soundproofing blanket Enclosure. For best results the enclosure should be as large as possible to allow less heat buildup and also to be more effective at reducing the noise output from reaching other areas and acoustically isolating the pump to contain structure borne sound being transmitted from where it is mounted.
Sources of industrial generator noise:
- Engine noise – This is mainly caused by mechanical and combustion forces and typically ranges from 100 dB(A) to 121 dB(A), measured at one meter, depending on the size of the engine.
- Cooling fan noise – This results from the sound of air being moved at high speed across the engine and through the radiator. Its level ranges from 100 dB(A) to 105 (A) dB at one meter.
- Alternator noise – This is caused by cooling air and brush friction and ranges from approximately 80 dB(A) to 90 dB(A) at one meter.
- Induction noise – This is caused by fluctuations in current in the alternator windings that give rise to mechanical noise that ranges from 80 dB(A) to 90 dB(A) at one meter.
- Engine exhaust – Without an exhaust silencer, this ranges from 120 dB(A) to 130 dB(A) or more and is usually reduced by a minimum of 15 dB(A) with a standard silencer.
- Structural/mechanical noise – This is caused by mechanical vibration of various structural parts and components that is radiated as sound.
Measuring noise Before you can begin to determine what mitigation might be required, you have to collect accurate sound measurements of both the existing ambient noise and the noise contributed by the generator set. Accurate and meaningful generator set sound-level data shouldbe measured in a “free field environment.” A free field,as distinguished from a “reverberant field,” is a sound field in which there are negligible effects from sound being reflected from obstacles or boundaries. Noise measurements should be made using a sound level meter and an octave band filter set, at a minimum, to allow for more detailed analysis by acoustical Consultants
Depending on the current sound levels of the generators and your noise reduction goals, an abatement solution can be determined. In most applications a soundproofing blanket enclosure will meet your sound reduction needs. This is a two to four sided enclosure with or without a roof. Typically a frame and track is constructed to suspend the sound curtain panels. The soundproofing blankets material is a composite material bonding mass loaded vinyl with an acoustical absorber and faced with a vinyl diamond stitched facing.
Strategies for reducing generator set noise
Using our Noise Control Blankets to construct a 4-sided noise control solution will significantly reduce sound. The noise reduction to be expected is a range of 20 to 40 decibels. The better the construction, weight of blankets and amount of soundproofing acoustic blankets used (the surface area) all factor into your sound reduction numbers. Ensuring all corners and edges are tight and that there are no gaps is a major factor. The size of the soundproofing blankets in which the amount of surface area that is available to dissipate and contain the noise is the other major factor.
Regardless of the type of generator set that needs sound attenuation, there are basically seven strategies for reducing generator set noise:
- reduce the sound level of the source;
- acoustic barriers;
- acoustic insulation;
- isolation mounts;
- cooling air attenuation;
- exhaust silencers;
- efforts to maximize the distance between the generator set and the property line (or people).
Noise Control barriers
Rigid materials with significant mass and stiffness reduce the transmission of sound. Examples include sheet steel typical of enclosures, and concrete or sand filled block walls or solid concrete walls typical of indoor generator room installations. It is also important to eliminate sound paths through cracks in doors or walls, or through access points for exhaust, fuel or electrical wiring. Our Noise Control Blankets come standard with grommets across top, mating Velcro along the vertical edges and corner seals.
Acoustic insulation
Sound-absorbing materials are available for lining air ducts and covering walls and ceilings. Directing noise at a wall covered in sound-absorbing material can be very effective. Selectmaterials that are resistant to oil and other engine contaminants. Fiberglass or foam may be suitable, based on factors such as cost, availability, density, flame retardance, resistance to abrasion, aesthetics and cleanability.
Isolation mounts
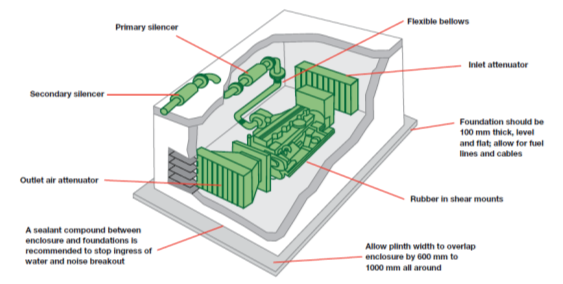
Vibrating equipment creates sound pressure waves (noise) in the surrounding air. Anything that is physically connected to a generator set can cause vibrations to be transmitted to thebuilding structure. These connection points include skid anchors, radiator discharge air ducts, exhaust piping,coolant piping, fuel lines and wiring conduit. Fitting these connections with flexible joints effectively reduces noise transmission. Mounting a generator set on spring-type vibration isolators effectively reduces the vibration and noise that are transmitted through the floor.
Noise Control enclosures
Steel and aluminum noise control enclosures of all kinds provide at least 10 dB(A) of attenuation for generator sets that must be located outdoors. In many cases, when combined with an effective exhaust silencer, this amount of attenuation
When locating generator sets outdoors, the use of enclosures – particularly sound-attenuating enclosures – combines all of these strategies into a convenient package that provides weather protection as well as sound attenuation.
Sound Attenuation is needed to meet local noise ordinances or reduce impact on employees or neighbors, special sound-attenuating enclosures must be employed.
Special sound-attenuating noise control enclosures combine both barrier and absorption noise control strategies to contain generator Noise. Stell Enclosure provide 2-3 dB(A) better attenuation.
Reducing noise by 20 to 40 decibels with this cost-effective, durable material is one of the best ways to solve noise control issues in commercial, facility & industrial markets.
Noise Control Enclosure Installation Instructions:
- Floor Mounted Acoustic Soundproofing Blanket Enclosure
- Mark and label the area where the enclosure will mount.
- Locate the Floor Mounted Base Hardware, do not attach to the floor yet.
- Slide roller tracks into track connectors on floor by squeezing ends of roller track together while sliding into connectors.
- Lift this track up and slip the track connectors on to top of floor columns.
- Line up the existing holes or drill holes (using a 2/16 inch hex key) as needed into the track for the screws to lock into the holes thru the track connectors.
- Lift the panels up to the track. You can use plastic ties to attach the panels to the track through grommetted holes (already installed by All Noise Control) in each panel. Review the customer supplied drawings for the appropriate panel placement. Make sure you know which direction to place the panels, be sure the Velcro seals are going to mate correctly.
- Apply and tighten all screws in connectors. Adjust hardware as needed for the panels to fit.
- Mount base to the floor.
- Connect panels with supplied vertically attached Velcro.
|


